Showing posts with label m3. Show all posts

Friday, 12 November 2010

Theme 1 - Other inflences

Once you consider the issue of 'cross dressing' the boundaries disappear and your can have complete creative freedom over the types of images you want to create. The following images are by a very famous and main stream photographer  - Annie Leibovitz and were published in a very famous and main stream magazine....'Vanity Fair'.


Annie Leibovitz

Annie Leibovitz was born in 1949 in Connecticut, USA and originally studied art and painting in the San Francisco Art Institute. After travelling with her family to Japan, she finally discovered photography and started taking night classes. Leibovitz got into the 'big time' when she approached the editor of rolling stone magazine and 1970 and showed her, her portfolio of images. By 1973 she was the chief photographer for rolling stone magazine.

The magazine started printing in colour in 1974 and Leibovitz followed suit with her photographs. Originally she was only ever taught how to take black and white pictures, so in 1974 when rolling stone magazine was printing in colour, she followed suit by taking colour images for the likes of Bob Dylan, Bob Marley and Patti smith. in 1975 she was the rolling stones official photographer and went on world tour with them. while on the road, she produced her iconic black and white portraits of Keith Richards and Mick Jagger.

In 1980 Rolling stone magazine was sent to photograph John Lennon and Yoko Ono who had recently produced a joint album. For the portrait she imagined that the two would pose together nude, however, Ono was not happy with this and it was only Lennon who was prepared to disrobe. after taking a Polaroid of the portrait, she knew that it was an amazing image.


 Several hours later, Lennon was shot dead in front of his apartment. in 2005, the American Society of magazine editors named it the best magazine cover from the past 40 years.


In 1983 Leibovitz joined Vanity Fair and was made the magazines first contributing photographer. At Vanity Fair she became known for her wildly lit, staged, and provocative portraits of celebrities. One of the most famous is Whoopi Goldberg submerged in a bath of milk.


Apparently, this image was a mistake (as stated in Annie Leibovitz 'at work') as Whoopie slipped and Leibovitz just managed to capture the moment before Whoopie was completely submerged! I think that the image is fantastic, with a wonderful humorous element and obvious contrast between Whoppies dark skin and the white milk of the bath. It truly captures Whoopies personality.

The following image of Martina Navratilova is intriguing. It portrays a masculine athletic woman moving a huge cog.


The use of light has created and image that contains clear definitionn of different tones and shapes. I love the way the light defines both the strength of the cog and the strength of Martina's arms and legs. It may portray the challenge Martina had with the Media at the height of her career in the 80's and 90's.


Saturday, 6 November 2010

Theme 1 - Miss Dina Collada - Project


Sourcing a subject

I contacted a number of 'cabaret gay' clubs in Birmingham, Derby and Burton via email and phone and after a number of weeks trying I was successful in locating 'Miss Dina Colada' (AKA David) who is based in Swadlingcote, Derby. David works as a hostess and singer in a number of establishments in the surrounding area (see above video)


Background info 

David has been doing this style of entertaining for the last 12 months and is growing his business steadily  with word of mouth. He is actively involved in a number of charities in the area and helps organize Leicester gay pride with his partner.

When we met, I was keen to understand what sort of images would help represent the character of Miss Dina Collada. He talked about his various influences and inspirations, one of which is Miss Cookie Monster who is based in London.  

ADD in Pics of Cookie Monster


Influences and research for shoot

David La Chapelle

The images of Alan Cumming below, portray a vibrance and exhibitionism associated with the Drag Queen genre.


La Chapelle appears to use bright colours, alternative subjects and high key lighting to produce these controversial yet stunning images. The focal point is the model and their actions and body positioning create the main focus on the image. The clothing, make-up and set all contribute to the final image and each picture is individual and portrays a different character.

The top image uses a very simple set (pink brick), with a single swing positioned in the centre. The model is the main focus of the image and as a cheeky touch, there is a small dog at the bottom right. The interpretation of this image could be 'a walk in the park', with the model as the dog walker who has decided to play on the park swings. The clothing and 'swing' is incredibly suggestive and I imagine the the purpose of this image is to delight as well as to shock. To delight and to shock is exactly the image that I want to create when photographing my model.


The bottom image is set in a warehouse/garage and portrays the image of a man in drag walking with purpose across the concrete floor. The red dress and the lack of a back to it draws the eye to the image and makes it the main focal point. A wind machine will have been used to generate the floating effect of the dress that produces a sense of movement in the picture. As before, the image is designed to shock and delight the viewer as it is very suggestive without exposing too much flesh!


Wednesday, 20 October 2010

Theme 1 - Re creation of a Dave Willis portrait

I found a portrait by Dave Willis of Skin (Skunk Annansie lead singer) that I was drawn to in Steve Bavister's book, 'Lighting for portrait photography'.


Dave Willis is a photographer who shoots portraits, fashion and music stars. The image below is that of Sharon Osborn:


This image portrays Sharon a strong and powerful figure as she is positioned sitting at the head of the table, clasping her hands. It looks as though the photographer has used a spot light on her face and body to make her stand out of the background and become the main focal point of the picture. The background is out of focus and is framed by the use of the curtain, surrounding the window. The window provides a 'grid like' effect with a series of squares and there is a soft reflection of light cast on the highly polished wooden table.

The position of the camera is slightly below eye level that reinforces the appearance of dominance. Sharon has also been dressed in a shirt, jacket and tie, which again, adds to the effect. Once seen, the viewer of this picture is left with the impression that the subject is a dominant figure who is strong willed and in control, very much like Sharon Osborn!

The following picture portrays a nearly angelic image:


This is a taken from a fashion shoot. 

The model is topless, however, the positioning of her body has produced a tasteful and evocative image. the main focal point is her back and shoulders. The light has created subtile tones on her skin and the 'garment' is loosely draped over her shoulders. The image is tightly cropped as the model takes up the majority of the frame. Her pose draws the eye to the shape of her body as the light has created highlights on the front of her chest without being obvious.


'Skin portrait'

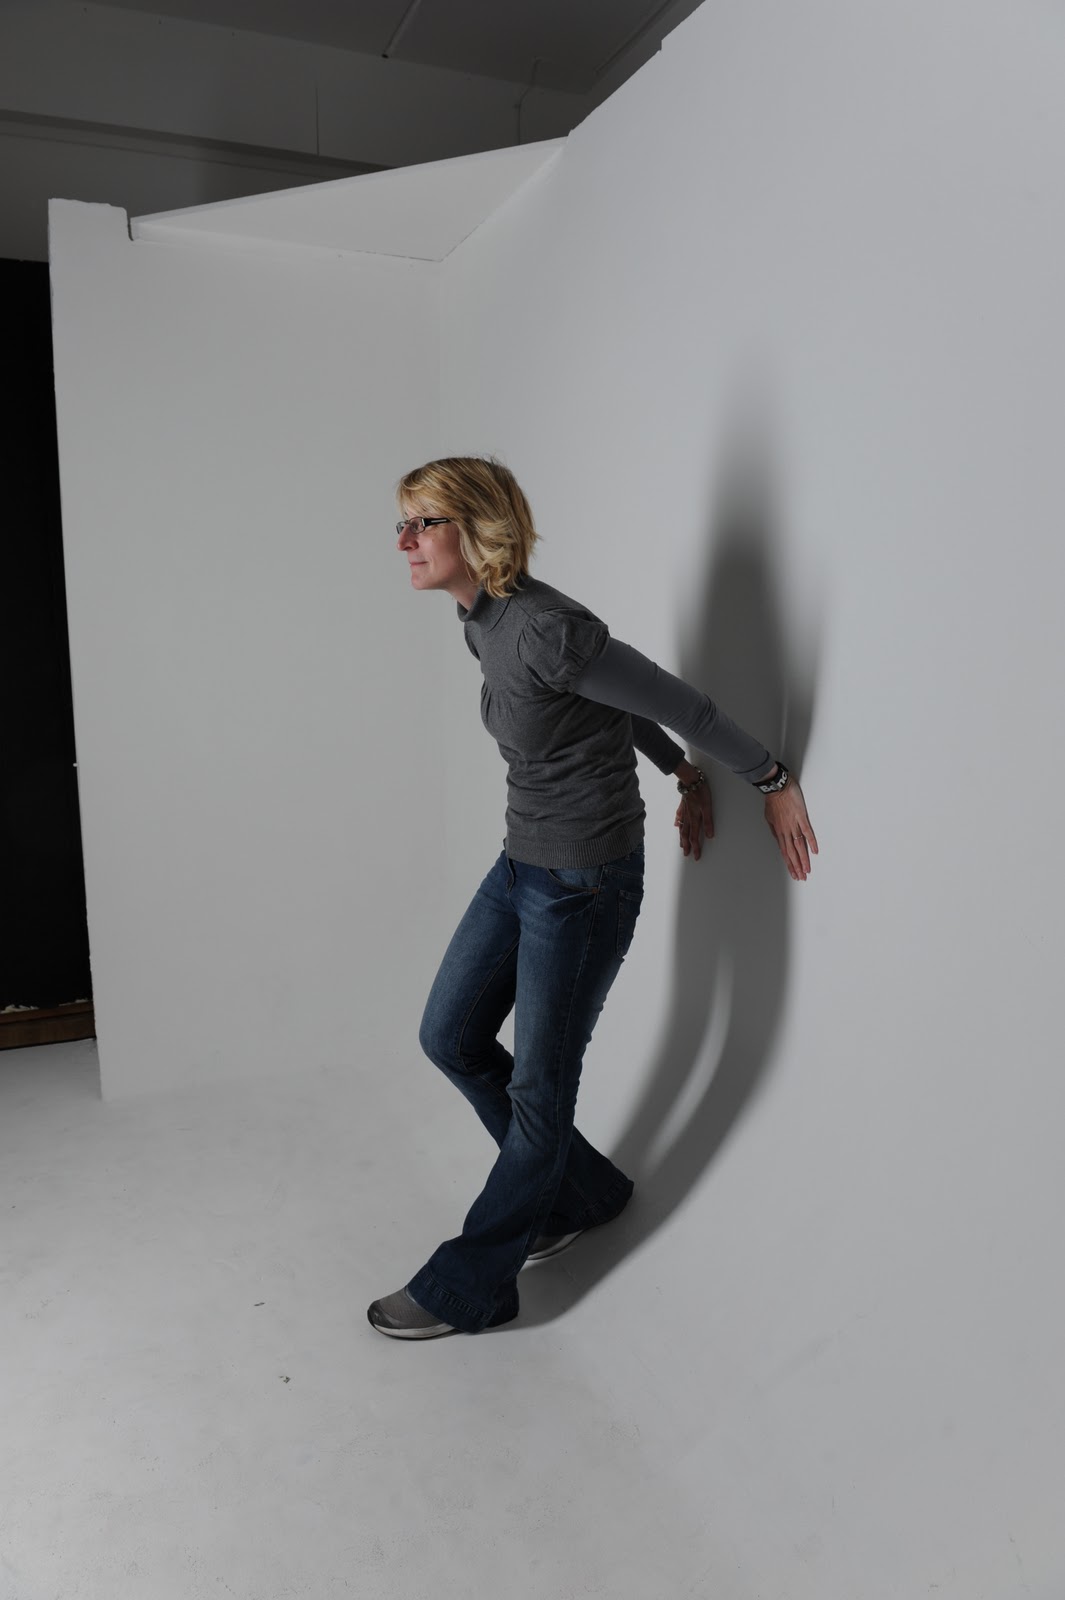
The photo was produced using film that was cross processed with colour negative chemistry to boost the contrast. The image was produced using a single light with a soft box, placed directly in front of the subject. The highlights on her arms are the result of light bouncing off the ceiling and off the wall she is leaning on. Her dark skin accents this. What I find interesting is the use of a curved slopping background that produces a significant curving effect that is enhanced by the slight shadow cast upon it. The subject looks as though she is about to take off and has a determined expression in her face. The tone of her skin has produced startling contrast against the white background. The use of the black and white clothing has also exaggerated this, producing a dramatic effect. The trousers are super wide and cover the shoes so that the subject's feet nearly vanish into the floor. The image looks over exposed as the contrast has been boosted post production. The following lighting plan was used:


The re-created image was shot at the college studio using the following equipment:

  • Nikon 700
  • Single Bowens flash head
  • Large rectangular soft box
  • Sekonic lightmeter
  • Interfit IR trigger
  • Fixed solid and curved backdrop
  • Post production - lightroom 3 and photoshop CS5
The bowens head was attached to the ceiling by a extendable rig. This was moved in accordance with the health and safety requirements of the college (The rig was moved by the Tutor when required). The camera was securely fixed to the mobile stand, as instructed by the tutor.

Step 1 - set up


The image above picture shows the set up that was used to create the shot. The camera was positioned on the stand on the right hand side of the set which enable me to shoot at an otherwise impossible angle.

Step 2 - The addition of the model


Maggie very kindly offered to pose for me. I directed her to adopt the pose of the model in the original photograph. Once in a suitable pose, I metered her using my sekonic flash meter. The chosen camera settings for metering were a shutter speed of 1/60 and an ISO of 200. It took a number of measurements to get the desired image as the original image looks over exposed. The following images were taken to achieve the desired effect:


 F 7.1                                    F 8.0                                 F 3.5

The final choice of aperture setting was f 3.5, because it produced the slightly over exposed effect that was essential for the picture.

Post production

The f 3.5 image was imported into photoshop, where I cloned in the white background to produce a seamless effect and added some noise using the addition of a filter:


I then used adjusted the curves to create the extreme over exposed look to match the original photo situated on the right of the screen:


The final image:


The original image:


Reflection:

There were obvious restrictions on what I could achieve with this project, the most obvious being the look of the model. My model had a significantly different look to that of 'Skin', however, what I have tried to do is re create the look of the picture that Dave Willis produced by using the correct lighting set up, correct use of equipment and the use of post production tools. 

Because the model was different and I didn't have to option to use the same clothing, the size and shape of the shadow is different and my image doesn't have the startling 'burnt out' look with skin's trousers.


Saturday, 9 October 2010

Theme 1 - Pic 2 - re-creation of Lemons and Limes

I wanted to practice re-creating further images at home, using the equipment I have there. I chose this subject (see above) due to lack of 'human' subjects to choose from! I also like it's simplicity and contrasting colours. The composition is also very simple with a central focal point.

I quickly realised that I needed a black background, a lime and lemon and a single flash head. I have a set of interfit EXD 200 flash heads and kitted it out with the standard reflector. I arranged the set up as shown below:


I then chose my 50mm lens and did a light reading using my sekonic L385 light meter. I chose a 1/60 sec shutter, manual focus and an aperture of f5.6 in order to get most of the subject in focus, but the background out of focus. I shot the picture just above the level of the subject. It is shot in RAW to enable me to change the white balance and exposure in lightroom 3 if necessary and produced the following image:


In order to achieve this picture, I tweaked it in lightroom using the following process:


I feel that the resulting image does resemble the initial image. What I have learn't from this exercise is:

  • How to create a softer cloning effect in photoshop by changing the cloning tool and changing the opacity.
  • Where to position the key light to create the correct level and position of shadow.


Friday, 8 October 2010

Theme 1 - Low-key photography

Low key photography


I have always prefered the more dramatic images of Low-key portraits than high-key as they seem to reveal more of the sitters personality and emotion. Below are a examples of low key photography:


 During Photography class last week I tried in the studio to re- create this image with the help of Maggie. I like this image because it is very atmospheric and moody, I also underestimated how difficult it was going to be!


The lighting set up was similar to this:


We used a single light with a honeycomb grid on the end to help direct the light.

'Like snoots and barndoors, a honeycomb grid ia an attachment that narrows and focuses the beam from a stobe lamp. The primary difference is that a honeycombe grid provides a smoother less dramatic graduation to the edge of the light. These grids come in four standard angles of beam widtht; ten, twenty, thirty, and forty degrees. The smaller the angle of beam width, the tighter the beam of light'. ('Digital photography and lighting' (2006) C.Jamieson and S.McCormick p.71)

The difficulty we had was where to place the key light. If we placed it at 45 degrees to the subject (as demonstrated in the diagram) the shadows were too severe and too much light landed on the models face. If we placed it slightly behind the model, we got a 'rimmed' effect that was not what we were after.

'Rim lighting is a technique used to give shape to objects in a photograph by backlighting the subject. When it is used in a subtle manner, rim lighting can be barely detectable. When rim lighting is used as an effect, it gives the subject a lighted halo around them and an ethereal look. Rim lighting is most often used to define shapes against a background, but it can also be used to highlight subtle effects of a photograph such as tiny hairs like those on the rim of a flower' (T Moergan (2009) eHow contri
The resulting image (see below) was taken with the key light  at about 50 degrees to the camera and against a black backdrop.


The metering was taken using an sekonic L-358 with a set ISO of 200 and shutter speed of 1/125. This recommended an aperature of f/4.0. I shot it using my Nikon D80 with a 50mm lens and used manual focus.

Reflection

Although I'm relatively happy with the final image, It doesn't quite replicate the image fully. It is also slightly out of focus and the background is not jet black as the light has 'spilled' over onto the floor of the studio. In the future to prevent this from happening I could use a heavy black cloth (velvet) on the floor inorder for the light to be fully absorbed. For a first attempt I'm quite pleased, but will try again and next time will use black cloth and focus on the subject before turning the lights off