Saturday 27 November 2010

Theme 2 - Still life - Research. Olivia Parker


After graduating from Wellesley College in 1963 with a degree in Art History, Olivia Parker began her career as a painter. She became intrigued with photography in 1970. Mostly self-taught in photography, she usually constructs what she photographs in the studio. Her photographs are fundamentally still life inspired by those painted in the traditional Dutch, Flemish and Spanish 17th century style, with their torn petals, sumptuous but imperfect fruit and improbable insects. Parker feels that photographic still life is still an open arena precisely because of those intrinsic qualities of this contemporary medium that distinguish it from painting. She says that the expression of the classical ideals of form is "dead matter" because the objects she chooses to photograph, whether alive or dead, are instead all signs of life. She is drawn to the implication of visual edges; the swollen limits of a ripe pear touching a hard line or light downy feathers, confined by a metal grid. Her photographs ask viewers to continually evaluate their meaning by never truly defining where the eye comes to rest.

Picture 1 - Top

The images of Olivia Parker above are simple yet effective. The four peas at the top produce an image full of texture, different shapes and tones. The lighting is high key with small shadows being cast from the end of each pod. The composition is simple yet effective as the pea have been position in lines, next to each other. This creates a sense of order and precision to the shot.

Picture 2

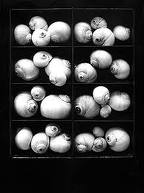
The sense of order continues into the next shot, that of snail shells in a wooden box. the box is divided into eight compartments and the shells arranged in a random order in each compartment. The high contrasting tones between black and white create texture in interest in the picture and the round shapes of the shells contrast with the square boxes in which they are contained.

Picture 3

The picture below this again, contains lines and order, mixed with randomly positioned objects. The piece of wood that the mushrooms sit on is hightly textured and has a deep grained effect. The black and white nature of the image enhances this contrast between the tones and creates texture.

Picture 4

This image is in a completely different style to the others. It shows the picture of a dried rose. It doesn't contain the order and simplicity of the previous images, instead it contains random patterns, complex shapes and less contrasting tones.


Theme 1 - Herb Ritts


Herb Ritts started his photographic career in the 1970's and gained a good reputation as a master of art and commercial photography. He not only produced images for Vanity Fair and Vogue, but also lead advertising campaigns for Calvin Klien, Chanel, Donna Karan and Gap.

The image of Drew Barrymore is full of soft tones and shades. It appears to have been lit from behind, creating a shadow accross the entire face, however, a light has been used to soften these shadows. The light behind is much brighter than that on the front, creating a stark contrast highlights, where there would normally be shadows.

The next portrait has been shot as a profile. The shallow depth of field, draws the eye directly to the face.  The profile contains a variation of shapes, tones and light. The dark skin appears flawless. It is thought provoking image as it makes you wonder what the subject is thinking.

The image below this is that of an athlete. I love the way Ritts has deliberately cropped off the top half of the subject, but she can been seen in full as a shadow. It is a wonderful way to capture movement, strength and determination in the subject.

Statement of intent - Theme 2, fine art

Intentions/purpose of the photography to be undertaken

For this theme, I have chosen to photograph 'Fine art'. The main theme for this will be the topic of fruit/veg and flowers as this is an area that will enable me to produce images of vibrance and colour and will be hopefully very appealing!

Reason for selecting this theme

Variation, colour, flexibility and creative potential.

The photo imaging equipment and medium that will be used and why


  • Nikon D80/D300 digital cameras.
I have chosen digital cameras as this is my area of knowledge. I have never used a film SLR camera as digital camera provide such flexibility and produce excellent results.

  • SB800 - Flash
  • Interfit 200 EXD studio kit
  • Prolica 400w flash heads
  • Highlight backdrop
  • Sekonic light meter
  • Interfit IR transmitter

Techniques that will be used and how they will help convey the visual image

I will be using the studio equipment and natural light to create my final images. I will also be using both lightroom 3 and Photoshop CS5 to do the post production work. I hope to produce some original and arty shots that convey, colour and mainly fun!

How light quality will be applied and controlled to help convey the visual message

As stated earlier, both artificial light and natural light will be used to maximize the impact of the shot and convey the desired message.

Risk and health and safety considerations

As with theme 1, all appropriate health and safety consideration shall be taken into account to ensure minimal risk to people in the surrounding area. Things to consider are:

  • The taping down of all loose wires with masking tape.
  • The correct assembly of backdrop stands, light stands, flash heads, back drop trains etc....
  • Adequate space is available to build the studio


Friday 26 November 2010

Theme 1 - John Swannell

John Swannell stared his photography career as David Baileys assistant. Born in 1946, he left school at 16 and spent a few years in a fleet street dark room churning out thousands of photos for use in the press. After he had secured the post of David Baileys assistant he was thrown into the world of fashion photography. After working with Bailey for a number of years he managed to branch out on his own. David Bailey even gave him a years salary to help him on his way!

 His solo career accelerated when some of his images were used in Italian Vogue and he was launched into the world of fashion photography in his own right. Fashion was always John's main source of income, but from 1975, he was at last able to indulge his own artistic inclinations on a private level. He began to experiment with the female nude, a genre which captivated his imagination and for which he is now particularly renowned.

I love this portrait of Maureen Lipman because of its simplicity. There is no glamour or sparkle, it is simply an honest picture. The 'high key' lighting converted to black and white has produced a wonderfully balanced shot with minimal facial shadow. It has an interesting composition as Maureen is positioned off centre and not looking at the camera. The tone, however, works really well with her dark hair, patterned top and stark background.


This picture of the princess of Wales and her two sons is very informal and relaxed. This style of portraiture allows the true character of the subjects to shine through. It is a style that I have personally adopted during my portrait shoots. It was unusual at the time to have such a relaxed and natural picture of the royal family and must have been a complete breath of fresh air. From this picture in 1994, he has since gone onto to photograph every Senior member of the royal family.


Swannell was commissioned to take this picture to mark the Queens Golden Jubilee. Again, it is unlike traditional portraits in the fact that the Queen, although dressed in formal robes, is posed in a natural way. The positioning of the queen in the picture is original and allows the viewers eye to be drawn into the distance.


This picture of Joanna Lumley in 2000 is again, very natural and un posed. The black of the top has created a silhouette effect. The low key lighting has produced a dramatic and defined effect with obvious shadow to the one side of her face. Her hand breaks up the silhouette effect and creates more detail in the shot.

Theme 1 - Annie Leibovitz - Monarchy


This video is a fascinating insight into the personality of the Queen and how Lebovitz deals with the pressure of the shoot. The resulting images are fantastic, however, I was suprised to learn how they were created with so much post production work.


The top image is highly dramatic with muted colours and shapes. It is a dominating image of the queen as she is positioned centrally in the photograph and is wearing a dark, strong colour. The bottom image is a little lighter as the queen is sitting and is not taking up so much of the frame. The colour of her clothing is much lighter and the use of highlights is much greater then the previous image.

Theme 1 - Annie Leibovitz ROLLING STONES

Theme 1 - Annie Leibovitz: Life Through a Lens

Friday 12 November 2010

Theme 1 - Other inflences

Once you consider the issue of 'cross dressing' the boundaries disappear and your can have complete creative freedom over the types of images you want to create. The following images are by a very famous and main stream photographer  - Annie Leibovitz and were published in a very famous and main stream magazine....'Vanity Fair'.


Annie Leibovitz

Annie Leibovitz was born in 1949 in Connecticut, USA and originally studied art and painting in the San Francisco Art Institute. After travelling with her family to Japan, she finally discovered photography and started taking night classes. Leibovitz got into the 'big time' when she approached the editor of rolling stone magazine and 1970 and showed her, her portfolio of images. By 1973 she was the chief photographer for rolling stone magazine.

The magazine started printing in colour in 1974 and Leibovitz followed suit with her photographs. Originally she was only ever taught how to take black and white pictures, so in 1974 when rolling stone magazine was printing in colour, she followed suit by taking colour images for the likes of Bob Dylan, Bob Marley and Patti smith. in 1975 she was the rolling stones official photographer and went on world tour with them. while on the road, she produced her iconic black and white portraits of Keith Richards and Mick Jagger.

In 1980 Rolling stone magazine was sent to photograph John Lennon and Yoko Ono who had recently produced a joint album. For the portrait she imagined that the two would pose together nude, however, Ono was not happy with this and it was only Lennon who was prepared to disrobe. after taking a Polaroid of the portrait, she knew that it was an amazing image.


 Several hours later, Lennon was shot dead in front of his apartment. in 2005, the American Society of magazine editors named it the best magazine cover from the past 40 years.


In 1983 Leibovitz joined Vanity Fair and was made the magazines first contributing photographer. At Vanity Fair she became known for her wildly lit, staged, and provocative portraits of celebrities. One of the most famous is Whoopi Goldberg submerged in a bath of milk.


Apparently, this image was a mistake (as stated in Annie Leibovitz 'at work') as Whoopie slipped and Leibovitz just managed to capture the moment before Whoopie was completely submerged! I think that the image is fantastic, with a wonderful humorous element and obvious contrast between Whoppies dark skin and the white milk of the bath. It truly captures Whoopies personality.

The following image of Martina Navratilova is intriguing. It portrays a masculine athletic woman moving a huge cog.


The use of light has created and image that contains clear definitionn of different tones and shapes. I love the way the light defines both the strength of the cog and the strength of Martina's arms and legs. It may portray the challenge Martina had with the Media at the height of her career in the 80's and 90's.


Saturday 6 November 2010

Theme 1 - Project Drag Queen - step 1

Sourcing a subject


I contacted a number of 'cabaret gay' clubs in Birmingham, Derby and Burton via email and phone and after a number of weeks trying I was successful in locating 'Miss Dina Colada' (AKA David) who is based in Swadlingcote, Derby. David works as a hostess and singer in a number of establishments in the surrounding area.

Theme 1 - Miss Dina Collada - Project


Sourcing a subject

I contacted a number of 'cabaret gay' clubs in Birmingham, Derby and Burton via email and phone and after a number of weeks trying I was successful in locating 'Miss Dina Colada' (AKA David) who is based in Swadlingcote, Derby. David works as a hostess and singer in a number of establishments in the surrounding area (see above video)


Background info 

David has been doing this style of entertaining for the last 12 months and is growing his business steadily  with word of mouth. He is actively involved in a number of charities in the area and helps organize Leicester gay pride with his partner.

When we met, I was keen to understand what sort of images would help represent the character of Miss Dina Collada. He talked about his various influences and inspirations, one of which is Miss Cookie Monster who is based in London.  

ADD in Pics of Cookie Monster


Influences and research for shoot

David La Chapelle

The images of Alan Cumming below, portray a vibrance and exhibitionism associated with the Drag Queen genre.


La Chapelle appears to use bright colours, alternative subjects and high key lighting to produce these controversial yet stunning images. The focal point is the model and their actions and body positioning create the main focus on the image. The clothing, make-up and set all contribute to the final image and each picture is individual and portrays a different character.

The top image uses a very simple set (pink brick), with a single swing positioned in the centre. The model is the main focus of the image and as a cheeky touch, there is a small dog at the bottom right. The interpretation of this image could be 'a walk in the park', with the model as the dog walker who has decided to play on the park swings. The clothing and 'swing' is incredibly suggestive and I imagine the the purpose of this image is to delight as well as to shock. To delight and to shock is exactly the image that I want to create when photographing my model.


The bottom image is set in a warehouse/garage and portrays the image of a man in drag walking with purpose across the concrete floor. The red dress and the lack of a back to it draws the eye to the image and makes it the main focal point. A wind machine will have been used to generate the floating effect of the dress that produces a sense of movement in the picture. As before, the image is designed to shock and delight the viewer as it is very suggestive without exposing too much flesh!


Friday 5 November 2010

Theme 1 - 'Family day' photoshoot

Overview - Shoot 1

Prior to this course I did a photoshoot in a local church hall to take some pictures of a friends band, since then, I have done several more shoots and for the purposes of this course I wanted to document the planning, implementation and post production and key learns from carrying out a photo shoot.

Planning phase

In order for the shoot to be successful, several key elements had to be planned and organised. The subject of my shoot was 'family' which would give me the opportunity to take pictures from all ages. The initial step was to arrange the date and obtain a venue. I chose the same place that I had used previously as It had great facilities and was very reasonably priced! From then I was able to secure the booking and start advertising the event to local friends and family.

I booked groups into slots of 30 mins, 20mins shooting time and 10mins break inbetween shoots. Prior to the event I texed everyone to ensure they were still able to make it. Unfortunately, due to a sickness bug, 3 out of the 7 were unable to attend. In hindsight, this was a blessing as it allowed me more time inbetween groups.


Equipment

1X lastolite highlight 6ftX7ft backdrop and train
4X light heads and stands (inc leads)
2X shoot through brollies
1X nikon D80
IR transmitter
1X 18-135mm lens
1X 50mm prime lens
1X lightmeter
masking tape
ipod and speakers
balloons
soft toy


Implementation

I arrived 1 hr prior to the first group to allow myself to set up the portable studio, take light readings and ensure all of the health and safety aspects had been covered. The lighting rig looked like this:


2 of the flash heads were placed inside the lastolite highlight to produce a uniformly lit backdrop. The other two heads had shoot through brollies attached to them and were placed either side of the backdrop train. The purpose of the brollies was to diffuse the light to create a softer and more uniform effect on the subjects. The meter readings were taken from the backdrop and facing the light.

In order to comply with health and safetly issues, I taped the cables and the backdrop train to the floor to avoid tripping (especially as yound children were going to be present)


The purpose of this lighting rig was to create a high key effect. (see link)


The shoot

When the first groups of people stared to arrive, I did a couple of test shots to check the levels. The following shot was taken using:

Shutter speed - 1/60s
Aperture - f1/16
ISO - 200
Focal length - 38mm


The apperture was f1/16 because of the strength of the lights in the backdrop. They only had a half power setting (200w) or a full power setting (400w). So in order to match the power with my front to lighting heads, I put them on full power in order avoid the halo effect around the subject when the background is lighter then the foreground.

http://www.entheosweb.com/photoshop/halo.asp

The above link will take you to a site that demonstrates how to produce a halo effect. I certainly didn't want the effect in my shoot, hence the small f stop.

The resulting shoot went well, with the production of a number of final shots that I was happy with as they reflect the subjects that I was shooting:


Post production/Key learns

I used lightroom 3 and CS5 to boost the levels and convert to black and white. My key learning during tghis shoot was to re-meter when changing lenses. On the last set, I photographed the following picture, without re-metering which resulted in the final image being over exposed:


Although the final image was better (see below), I struggled to improve it sufficently for complete satisfaction.


I learn't a valuable lesson during this shoot and used it on my next shoot the following week.

Overview - Shoot 2

A friend of mine has a friend who is the Matron at Oundle School near Peterborough who was very keen to have a photo shoot by me after seeing the results of a photo shoot that I did for my friend in June. The following link provides an overview of the school, it's grounds and local area. I used this in my research so that I could plan the day. 

http://www.oundleschool.org.uk/

Planning phase

The main areas that I had to consider in my planning were the following:

  • Location and traveling time
  • Available space for setting up the equipment
  • Talking to the Client to determine the types of shots she wanted, who will be attending and how much time was available to complete the shoot and pack away the equipment.
  • Equipment planning, did I need to borrow any pieces of equipment in order to complete my shoot?
  • Health and Safety - what are the health and safety considerations in the venue?
  • What sort of final image does she want? e.g. disk with final images, canvases, prints etc...

Equipment


1X lastolite highlight 6ftX7ft backdrop and train
4X light heads and stands (inc leads)
2X shoot through brollies
1X nikon D80
IR transmitter
1X 18-135mm lens
1X 50mm prime lens
1X lightmeter
masking tape
ipod and speakers
balloons
soft toy


Implementation 

I arrived an hour early as I had a distance to travel and wanted to allow time for traffic. After meeting the client, I set up in the allocated room using the above listed equipment.

The Shoot


The shoot lasted 3 hrs and consisted of a variety of people with age ranges from 4 months to 84 years old!


Theme 1 - Timography Video Blog #11 - High Key Lighting -- Part 1